Search This Blog

Showing posts with label soy sauce. Show all posts

Friday, 8 March 2013

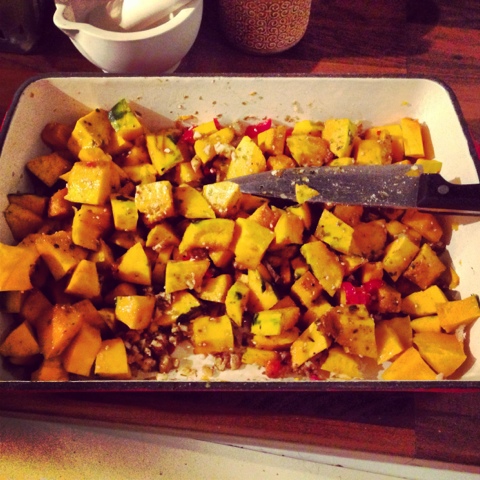
Walnut Roasted Squash

Tom today!

My housemate James is a proper bargain hunter, and recently he found us an offer to get four veg boxes (from the riverford company) for 20 pounds. As a result we've had a nice variety of vegetables we've been trying out new recipes with. This is a variation on a recipe I make quite a lot with roasts. Here I've really extended the Asian flavours, and the walnuts and pumpkin mix well.

Ingredients (serves 4 as a main or around 6 as a side dish):

1 Japanese Pumpkin
3 cloves Garlic
1 Red Chili
1 tbsp Sesame Seeds
4 tbsp Soy Sauce
2 tbsp Sake
3 tbsp Olive oil
120g Walnuts
Salt and Pepper (around a tsp of each)
1 tsp Nutmeg
1 tbsp Sea flakes
1/2 Red onion

Method:

Preheat the oven to 200 degrees Celsius
Peel the pumpkin, then halve it and scoop out the seeds (I find it much easier to do in that order)
Chop into 1 cm chunks
Dice the garlic and chili finely
Crush the walnuts and slice the onion roughly
Throw everything in a roasting tin
Add the oil, sake, seeds, soy sauce and spices
Season to taste
Toss everything to mix and coat it all
Bake until the pumpkin is soft - around 35 mins
(If you find that quite a lot of liquid is coming out, you might like to turn the oven up for the last 15 minutes to boil off the liquid and crisp up the pumpkin slightly)

This is quite a simple recipe, and goes really tasty with the sweetness of the raisins in the baked cabbage recipe (link). Hope you enjoy it!


Hazelnut and Carrot Loaf

This is the recipe that I made with my family on actual christmas day. It went down extremely well with both me and my non-vegan family who enjoyed it as a kind of stuffing-esque side dish. It made a nice change from the parsnip and cashew nut roast (which I love but have made every roast dinner since I went vegan). This made two small loaf tins, both of which I cooked and one which I froze for a later date (which worked fine!).

Ingredients:

125g Chopped Hazelnuts
125 Wholemeal Breadcrumbs
2 tsp Olive Oil
1 medium Onion
2 large Carrots
2 sticks Celery
2 cloves Garlic
1 tsp Thyme
1 tsp Sage
1 tsp Mixed Herbs
1 tsp Nutmeg
2 tbsp Soy Sauce
1 Courgette
100g Red Lentils
1/2 cup Mushrooms

Method:

Preheat your oven to 200 degrees Celsius
Chop the onion roughly and fry in oil until soft
Grate the carrot, and chop the celery, mushrooms and garlic and add these to the pan
Fry these until soft
Add the nuts, breadcrumbs and spices and mix thoroughly
Cook the lentils in salted water until soft, strain and add these to the pan
Remove from the heat, and stir through the soy sauce
Place half into a loaf tin (/a quarter into two tins if making two)
Using a peeler, make thin slices of the courgette
Layer these onto the first layer of the loaf
Cover with the rest of the mixture, and then smooth down
Bake for 40 minutes, until browned and relatively set
Either turn out into a plate and serve or leave to cool and then freeze

Not much else to say with this recipe. If you think it's lacking in seasoning a bit crumble half a vegetable stock cube on before the soy sauce, or use a teaspoon of Bouillon. I didn't think it really needed t though. I'm sure other nuts would work with this as well, almond would go nicely I think! Let us know how yours go at twocooksoneblog@gmail.com


And a very belated happy Christmas from the Scurr household!

Monday, 25 February 2013

Spicy Noodle Salad

This recipe is originally a Jamie Oliver recipe that I adapted and changed a bit. I have made it several times and tweaked it a bit each time, and this time I decided to use the opportunity to try and do something interesting with the stalk of broccoli - something I always feel wasteful throwing away but never really know what to do with! Using this method of slicing it really thinly and marinating with courgette and carrot worked really well

Ingredients:

1 stalk of Broccoli
1/3 Courgette
1 Carrot
1/2 cup White Cabbage (shredded)
2 tbsp Rice Vinegar (any nicely flavoured vinegar will work really)
1 tbsp Sake (optional - I didn't include this but it would have gone nicely)
1/2 tsp Sugar
1/6 tsp Salt (just a big pinch really)
3 Cakes Wholewheat Noodles
1 Chili
1/2 Red Onion
1 tsp Coriander
1 Lime
1 tbsp Sesame Oil
1 tbsp Soy Sauce
1 tbsp Brown Sugar
2 tbsp Sesame Seeds
1 tbsp Pumpkin Seeds
Salt and Pepper

Method:

First to marinate the vegetables, mix together the salt, sugar, vinegar and sake
Slice the vegetables thinly, about 3-4 mm thick (if you have a mandolin use it but I managed fine with a knife)
Pour the mixture over the vegetables and toss to coat, set aside
Boil a kettle and pour over the noodles, leave to soften and then strain with a colander
Cover with cold water to stop them from cooking, and also to stop them socking together
Heat a small pan, add the seeds and then the sugar
Once the sugar melts, take off the heat stir constantly to coat the seeds well - if they start to stick in clumps break them up now as it's easy while they're still hot but once they're cool it's much more difficult
Leave to cool (you might want to transfer them onto a sheet of baking paper and put the pan straight in to soak, burnt/melted on sugar is an absolute pain to clean off)
Chop the onion and chili and mix in a mug with the soy sauce, sesame oil and coriander
Juice the lime into this and add about half of the zest (feel free to add more if you like but I find this make the lime too overpowering - I'd usually go for about 1/3 to be honest)
Strain the noodles, then combine with the onion and chili mixture
Toss to coat well
Stir in the vegetables
Season to taste
Serve!

The vegetables used in this are pretty flexible, I thought it was a good and easy say to use up the broccoli stalk but you can make it with anything. Some mangetout or sugarsnap peas make a nice addition. The sesame oil and sweetness of the seeds go really well together. I like this about as hot as I can stand it but that's just personal preference. Let us know any suggestions you come up with at twocooksoneblog@gmail.com

Sunday, 10 February 2013

Walnut, Lentil and 3 Mushroom Pate

Tom here,

Sorry guys! It's been quite a hiatus over the exam period but Jess has managed to get a few recipes up, and now I have a bit more time I'm hoping to get a few more up. Got a few new recipes to upload over the next few weeks (including the dinner I made on actual christmas day at my parent's) This is a part of four different recipes I made for a wine and cheese evening we had to celebrate the new kitchen we've had installed in our university house! It's amazing, I would happily marry that oven and never look back. Sadly that's illegal. I think. Or at least frowned upon.

Obviously a wine and cheese evening presents a slight problem for veganism (and an even bigger one for gluten intolerants) but I managed to whip up a vegetarian pate, an attempt at vegan boursin and a couple of different types of truffles for something sweet.

Ingredients:

150g Walnuts
120g Oyster Mushrooms
120g Chestnut (cremini) Mushrooms
120g Shitake Mushrooms
100g Red Lentils
100g Shallots
2 cloves Garlic
1 tbsp Butter (I used sunflower, but usually prefer soya)
1 tbsp Thyme
1 1/3 tsp Sea Salt Flakes
1 tsp Black Pepper
1 tbsp Light Soy Sauce

This recipe is an adapted version of one I found online, I've used different mushrooms for more flavour, but each of these were purchased in sainsburys in fallowfield so they should be pretty easy to get hold of. The lentils added give a bit of a texture boost, but could be omitted easily.

Method:

Preheat the oven to 180 degrees celcius/ gas mark 4
Boil the red lentils until soft
Toast the walnuts for 5 minutes until browned and fragrant (they smell amazing!)
Leave the walnuts to cool
Dice the shallots and fry in the butter until soft
Chop the mushrooms and add to the pan
Crush the garlic and fry as well
Remove the stalks of the thyme and chop and add to the frying pan
Crush the walnuts in a pestle and mortar (may require a few batches)
Add all the ingredients to a jug and blend using a hand blender
Spoon into a bowl and refrigerate for a few hours
Stir in the soy sauce just before serving to give a nice flavour boost
Serve with crackers or use as a spread for sandwiches

This should keep in the refrigerator for about 3-4 days. This is quite a simple recipe, and can easily be adapted with more herbs, or even changed entirely if you wanted to make a different style. The mushroom types can be substituted for any really, I just happen to like these three (and they were all available) using a large amount of two or one type would be fine, but the pate would definitely loost some of it's flavour.

As always let us know any suggestions or tweaks you come up with at twocooksoneblog@gmail.com.

And hope you all had a nice christmas/January, will definitely not leave it so long for a new recipe this time!


As you may notice I got a bit carried away cooking and forgot to take photos. Sorry! Next time I will take some more I promise!

Wednesday, 19 December 2012

Pad Thai

Hey guys, both me and Jess here today,

This is a dish I've made a few times, it's one that I've adapted slightly to suit my tastes but is based on a recipe you can find all over the internet and in all thai restaurants. However, when I've looked on the internet, almost every recipe seems to differ and there is little in common. This is a recipe that can be easily adapted to have meat, or to be vegan, and to be gluten free or gluten...full (?) noodles. This time I'm making it vegan, gluten free and without tofu as Jess isn't too keen on tofu yet, and I've only just got her into thai food so yeah, baby steps. Anyway, I'll mention times where you can include different things if you want too. I'm using spring onions here instead of regular white onions so I add them later, but if you're using a white onion then add it earlier on. Also all of the vegetables are changeable, these are the ones we wanted/what asda had to offer, you can pick your own! Traditionally (as far as I can gather) Pad Thai uses both chicken and tofu, and coats the noodles in egg to give a thicker consistency, feel free to add an egg if you prefer, you can substitute this for 1/4 cup of silken tofu, but I don't think this gives quite the same effect so I prefer just to leave it out.

Serves 4

Ingredients:

For the Pad Thai Sauce:

1 tbsp Tamarind Paste (this sounds like something no one has ever heard of but the Sainsbury's in fallowfield sells it so I'd imagine most do)
1 tbsp Peanut butter (if it's not crunchy, it's not worth it.)
3 tbsp gluten free Soy Sauce (or normal, I use dark because I prefer the colour and flavour it gives but as ever, you're the boss!)
3 tbsp Brown Sugar
1 tsp Crushed Chilis
1 tsp Ground Pepper (ish)
1/3 a cup of Stock (I used boiling water with 1/4 of a Kallo cube in it)

For the veg:

1/2 Courgette (sliced)
1 Pepper (chopped into sticks)
1/2 cup Mushrooms (sliced)
1 Carrot (thinly sliced)
3 Spring Onions (sliced into rings)
Handful of Mangetout
Handful of Sugarsnaps
1 hot Chili
1 large handful of crushed Peanuts
1/2 a pack/1 1/2 cup Beansprouts
Large Handful of Spinach

For the noodles:

4 cakes/a 4 person portion of whatever noodles you want (we're using a pack of tesco's fresh rice noodles as they are both nice and vegan/gluten free but anything will work, I would usually flat wheat noodles as I like the texture)
1 pan of Boiling water

Salt and Pepper to season
1 Lime
A dash of oil to fry in

Optional: 1/2 a chicken breast per person, marinated in soy sauce, stock and garlic beforehand, or 1/2 a block of diced firm tofu (don't use silken here) marinated in the same way. You can use other meats if you'd like but you'll probably have to adjust the cooking time for this, try to shred whatever you're using so it cooks quickly. Pork and beef would both work well I imagine.

Method:

First cook the noodles (if you need too) place in the boiling water and leave for 5 minutes to soak until soft, or if you're using large noodles and you think they need simmering briefly then simmer then, then strain and leave in cold water so that they don't stick together.
Mix the sauce together, the boiling water should help with this.
Heat the oil in a frying pan (you'll need a large one, we ended up splitting into two pans) over a high heat
Now add the onion if you're using one, and chicken and/or tofu, fry until just browning and the onions are sweating.
Add the chili - if you're following this recipe exactly and this is the first thing you're adding just fry the chili on its own for a minute or so before adding the rest of the vegetables.
Add the vegetables - all except the beansprouts and spinach (these will go in right at the end), if you like you can stagger them to get an even cooking, I'd add the courgette, carrot and pepper first and brown and then the rest, but honestly I generally like the crunchy vegetables crunchy and the softer ones softer so I chuck it all in and cook for the same amount of time.
Add in about 1/3 of the sauce mixture and toss through, as the vegetables start to cook you might need to reduce the heat slightly to prevent burning
Toss in the peanuts as well
Fry everything until it's starting to look cooked
Now add your noodles and all but a couple of spoonfuls of the sauce - use a spatula to break the noodles up a bit so the veg and noodles mix well (otherwise you get all noodles on top and all the veg at the bottom) - now is when you would add a whisked egg
when the noodles are heated through and everything is well combined, add the spring onions (if you're using them) beansprouts, spinach and the remainder of the sauce (just to coat the last few things)
Make sure the sauce is properly reduced (i.e. not just a runny mess at the bottom and has given everything a nice coating)
Serve and enjoy!

This recipe can be easily adapted to any different combination of meat, vegetables and noodles. I like to add red cabbage to my stirfrys at the last minute so there's something with a nice crunch as you eat it, but again this is just personal preference. Let us know any changes you make at twocooksoneblog@gmail.com

NB// these go exceptionally well with the Cherry Bakewell Monkey Bars we made for afters! http://twocooksoneblog.blogspot.co.uk/2012/12/update-cherry-bakewell-monkey-bars.html

Christmas themed recipe soon to come!


Sunday, 2 December 2012

Pan-Fried Cabbage


A quick one from Tom today,

Whilst making a thai red curry, the internet (I have absolutely no clue where I found it) suggested this as a nice side for the meal. However, it was so freakin tasty I felt it deserved it's own post, and I will definitely be putting this on the side of many more things! This would also work well with white cabbage if you prefer (or a mixture), I'm not sure about savoy or chinese but I think they would be okay.

This makes enough for a small side for two

For the Pan-Fried Cabbage:

1 tbsp Olive Oil
1 cup of shredded Red Cabbage
2 cloves Garlic
1 tbsp Soy Sauce (I used dark)
1 tbsp Saki (optional, I thought it added a nice flavour)
Salt and Pepper to taste

Heat the oil in a frying pan.
Add the cabbage, garlic, saki, soy sauce and fry on a high heat for just a couple of minutes so all the liquid is gone and the cabbage is nicely coated but still crunchy.
Once off the heat, season as you like.
Enjoy!


Nutritional Information (calculated using myfitnesspal.com) -


                      Calories   Carbs     Fat     Protein     Sodium     Sugar
          Total:      201         13        14          2            625           5
Per Serving:       101           7         7           1            313           3


Saturday, 1 December 2012

Tom's Teriyaki Sauce


This is just a quick recipe of how to make my version of teriyaki fried…well anything. Here I’m using Tuna for the sushi that me and Jess made (link) but you can really do it with anything. I also used leftover sauce to teriyaki some sugarsaps for me. Salmon also works really well!

Ingredients for Teriyaki Tuna

1 Tuna Steak (any size is fine)
1 part Dark Soy Sauce
1 part Mirin
1 part Saki (rice wine)
1 dessertspoon Sugar

For the vegan alternative Teriyaki Sugarsnaps:

The rest of the Teriyaki Sauce
Handfull of Sugarsnap Peas

Method:
Mix the soy sauce, mirin, saki and sugar in a cup.
Heat up a frying pan on a high heat.
Add the teriyaki sauce and continue to heat until it starts to bubble really furiously around the edges. This will reduce the sauce down to a thick glaze.
Add your meat (with any skin removed). Cook just quickly on one side (as if you were searing) and then flip over to cook on the other side, only a minute or two for each.
Then, flip over once more to give the meat a good coating in the sauce and then remove from the frying pan into a plate to serve.
Jess <3 Teriyaki


Enjoy either as a dish with rice or vegetables, or use with sushi rice to make nagiri or maki or uramaki as you like. For our guide on making sushi see (link).

Asian Roasted Sweet Potato Wedges

Tom here,

Another quick recipe today. This is a simple dish I often made on the side of whatever else I'm making, often a noodle salad or stirfry. Super quick and super tasty, it's a favourite of mine at the moment. I call it asian because I'm not sure exactly what else to call it, but it uses classic pan-asian ingredients so we'll stick with that.

Ingredients:

1/2 a Sweet Potato
1 tsp Turmeric
1 tsp Coriander
1 tsp Brown Sugar
1 tbsp Dark Soy Sauce (light is fine but I prefer dark)
1 tbsp Toasted Sesame Oil

Method:

Preheat an oven to 220 degrees celsius.
Chop the potato into wedges.
Mix all ingredients in a roasting tin.
Roast for half an hour, until crispy and black.

Serve with satay sauce and a spicy noodle salad (recipe hopfully to follow!)

Nutritional Info:


                      Calories   Carbs     Fat     Protein     Sodium     Sugar
          Total:      285          38       14          2           365          10


Serve with Teriyaki Sugarsnaps as the perfect starter/side for any asian meal!


Wednesday, 28 November 2012

Thai Pineapple Fried Rice

Hi, Jess today!

Tom is usually the King of Asian cuisine, however during a nervous introduction to Thai food in New York, I tried this (I mean how wrong can you go with pineapple and rice?), realised I love Thai food and decided to make this myself and improve it to my own taste. I've always loved rice dishes, and when you're wheat intolerant you come to love rice simply because you can eat it. If you're a meat eater, its great with some fried chicken or prawns in it, however I made it for Tom so this recipe is fully vegan. Traditionally this dish is served in a sliced open pineapple, however I have not yet got round to this. Next time I make it, I'll try to remember because it'll look pretty in a picture.

As usual, use whatever quantity you need of the ingredients, I am no better at sticking to measurements than Tom.

1 cup jasmine rice (cooked and left in the fridge for an hour or two)
1 small tin of pineapple chunks in juice (or slices, chopped)
2-3 spring onions, sliced
2 cloves garlic, finely chopped
1 red or green chilli, chopped (try to go for a hot one - this dish is great spicy)
1/4 cup raisins
1/4 cup cashew nuts
1/2 cup sliced mushrooms
1/2 courgette
1/2 cup peas
1 pepper, chopped (colour is optional based on your preference)
1/2 cup vegetable stock
Oil 


Sauce - 4 tbsp soy sauce
1 tsp curry powder
1 tsp cumin
1 tsp honey (optional)
2 tbsp pineapple juice (from tinned pineapple is fine)

Firstly, mix the ingredients for the sauce together.
Fry the spring onions, garlic and chilli on high heat in oil for a few minutes. Add a little stock to keep it sizzling (but don't add too much, just a little at a time). Once this looks cooked, add the mushrooms, courgettes and peppers until softening, adding a little more stock if needed. Then, add the rice, raisins, peas and cashews. Drizzle the sauce over the rice and stir fry for about 7-8 minutes, until the rice has taken on the colour of the sauce. When it looks ready, try a bit and flavour it accordingly - add more soy sauce, pineapple juice, salt, pepper, whatever you feel it needs (I usually add a bit more soy and pineapple just for a stronger flavour but up to you). Be careful not to overcook the rice, it will end up soggy.


Serve fresh. Preferably in a pineapple. But in a dish is fine too.

This can be varied by adding different vegetables (carrots work well), and by using meat or fish. If you like egg, add an egg between the chilli and the veg and cook it like scrambled egg. This dish is really filling and is a great one to make for a big group, especially when you have dietary requirements (such as veganism and gluten freeism). Enjoy and let us know what you think and what changes you've made at twocooksoneblog@gmail.com !

Jess Loves Sushi!

TEAM EFFORT TODAY! GO TEAM.

Guys, it is a momentous day today. After this, Jess will no longer be...a sushi-making virgin. That's right, today I am teaching Jess (and all of you) how to make sushi. Because sushi is wonderful. As is Jess (nawh).

Anyway first things first, you do need quite a lot of ingredients for this, but it's really not that hard! Don't be put off by false tales, everyone is lying, sushi is easy to make! It is time consuming though, so set aside an evening with you and a couple of friends and have fun making your own combinations as you want them. First things first though, you will need to get yourself a sushi mat. Any asian food store will have them, even Sainsbury's do now (but you have to buy a kit sadly), normally they cost about a pound and you can reuse them and have delicious sushi for evermore. In a perfect world. Second step is to get a copy of this book:

Seriously, it's awesome.


Jess loves it too


It's one of my favourite cookbooks. I still haven't made half the stuff in it, but one day I will, and till then it's served me well enough. You may notice a theme today, and that is Jess loving things. As I introduce her to the wonders of japanese cooking, I make sure that she has the time to stop and appreciate each thing in turn. And then photograph it. Because Jess <3 sushi. Seriously, I'm making her a t-shirt for christmas. Jess must <3 sushi forever.

Many people are put off sushi because of the raw fish. Because I'm vegan I'm not putting any meat in mine, because honestly I think it's fine without it (not that a good piece of tuna sashimi isn't melt-in-the-mouth gorgeous, but that's for other people) and for Jess I'm cooking a nice piece of teriyaki tuna with some reduced tuna steak we found in Sainsbury's (student life win) to put in her maki (rolls). Before I start, if any actual japanese cooks, or even people who actually know what they're talking about, I apologise deeply for any inaccuracies here, I am 100% self taught through experimentation and far too much time spent on the internet in the early hours of the morning, so chances are this will not be authentic sushi. However, it tastes amazing anyway, so sorry if I get anything technically wrong here, this is just how I do it. And it works. Also I'm only making maki and uramaki here (these are both rolls) as these are my favourite and to be honest, I've never had much luck making nagiri.

That aside, here is what you will need to make some sushi:


For the Rice:

2 cups Sushi Rice (this is japanese short grain rice)
2 1/2 cups Water (cold - always cold!)
5 tbsp Mirin (normally I use rice vinegar with a bit of sugar and salt added, but mirin was the same price in Sainsbury's so I thought it would be easier - to make mirin use 1/3 cup rice vinegar with 1/2 tsp salt and 1 tsp sugar)

Tom's Sushi Protip No 1: Sushi rice is hella expansive. A bag is about a fiver and most supermarkets won't sell it. However they do sell pudding rice in equivalent sized bags for about seventy pence. If you read the small print on these bags you will notice that pudding rice is in fact 'Japanese Sweet Short Grain Rice' until you add evaporated milk to make it into rice pudding. This sounds familiar? Yes, this pretty much the same as sushi rice, for a ridiculous amount less. Buy it. It's not the same grade as sushi rice so it doesn't hold together quite as well but if you (like me) like to keep your money then this is a good save.

For the Rolls:

5 sheets of Nori (this is the seaweed used to wrap up the rice)
1 piece of Teriyaki Tuna (link)
1/2 a Cucumber
1/2 a Red Pepper
1/2 a cup Red Cabbage (thinly sliced)
1/2 a cup Grated Carrot
1/8 a cup of Red Onion (thinly sliced)
Vegan Mayonnaise
A couple of tbsp of Toasted Sesame Seeds

For the table:

A bit of Soy Sauce (for dipping in a shallow bowl)
A whole lot more Saki (for drinking as you eat)
Chopsticks (because if you made this much effort, you definitely have to eat it properly)

Method:

Let's start with the sushi rice:

First wash the sushi rice under cold water until the water comes off clean (you'll see what I mean as it happens - usually takes about 5-10 minutes)
Then leave to dry again.
Then place in a saucepan with a tight fitting lid (preferably seethrough - you'll see why) and add the water.
Place on your medium heat hob and put on full heat, then put the lid back on.
As soon as you can see white bubbles in a ring around the edge of the pan, turn the heat down to the lowest.
Now here's the hard part, do. not. touch. it. This is why it's best to have a seethrough lid, so you can see what's happening (if, like me, you're a control freak who has to watch everything like a hawk at all times).
You need to leave it for around 15 minutes until all the water is absorbed. If you take the lid off it will loose pressure and heat really quickly so try your hardest not to do this.
Once all the water is absorbed, take the lid off, give it a quick (but gentle) stir with a wooden spoon (so as not to damage the grains) to make sure it's not stuck to the bottom, then put a teatowl over the top and put the lid back on to steam for a further 10 minutes.
After this you need to clear a big space on your worktop and cover it with a sheet of tinfoil or clingfilm.
Spread the rice out on this in a thin layer (still being gentle).
Make cross shapes in the rice and pour in your mirin into these, then gently fold into the rice. This seasons the rice and gives it the flavour of sushi rice.
Now get a book, or a fan if you have one, or in our case, a piece of Cornflakes box we found in the recycling, and fan the absolute crap out of your rice. You want to cool it as quickly as possible so it stops cooking and retains it's shape, so fan it all on one side, then flip the rice over (as best you can) and fan that side until it's all about room temperature. Now you can put it into a dish, clingfilm it, and put it in the fridge whilst you get everything else ready.


Jess <3 fanning rice

Tom's Sushi Protip No. 2: Clingfilm your mat with two layers of clingfilm, this way nothing sticks to it, and instead of having to clean it, you just peel off the clingfilm and done.


Tom's Sushi Protip No. 3: Always keep your hands wet. Not sopping, but pretty wet, then the rice won't stick to your hands (well it won't as much anyway). Have a bowl of water in front of you as you roll the sushi so you can keep them wet.

Tom's Sushi Protip No. 4: Nori has two sides, a smooth shiny side and a rough matt side. Have the smooth side down and the rough side up as you make your sushi so the rice will stick to it.

To make the maki:

Preparations (yes, there's more):

Chop the cucumber and pepper into long thing strips so they will fit inside the rolls.
Toast your nori, use the biggest frying pan you have and then literally just heat it up to a medium heat, and dry-fry the nori until they smell toasted and go crispy. You should have enough rice to do 5 sheets.
Toast the sesame seeds.
Assemble everything on a table (so you can sit down) and have all your ingredients in front of your and your mat (including a bowl of water), this will just make it easier.


Assembling your maki:

Take a sheet of toasted nori, shiny side down, on top of your mat.
Cover it with rice up to an inch from the top edge, here you don't need to be gentle with the rice (since you're about to eat it) so don't be afraid to press it down firmly.
Line up your vegetables an inch and a half from the bottom (as in the photos).
Jess made teriyaki tuna with cucumber and pepper, I put cucumber and pepper in some of mine, then another I filled with grated carrot, red cabbage, onion and a line of mayonnaise to give a coleslaw-like flavour to it. All with liberal sprinkling of toasted sesame seeds over the rice.
Now begin to roll the maki. First fold all the way over until your vegetables are in the centre of a roll (it will look kinda like a snail). Again, be firm with it, give it a good squeeze all the way along to make sure it's rolling properly. Then in stages roll the mat over and then peel it off a bit, until all the rice is gone and you can just see the inch of nori you left uncovered. Wet this slightly with a bit of water to help it stick and then roll up fully and give the maki a good squeeze before you remove the mat (it should be just lying on top of it by now).
Now you just need to cut the roll into six with a sharp knife (also wetted from your bowl to stop it sticking) - easiest way is in half then into three.
Assemble on a plate with your other maki and get ready to eat!


Guess what? Jess <3 sushi ingredients

Tom is indifferent to sushi

Tom's veggie maki with cucumber, pepper, teriyaki sugarsnaps and vegan mayonnaise


Jess' maki with cucumber, red pepper and teriyaki tuna


Making sushi is great, just look how much fun Jess is having.


To make uramaki:

Uramaki are simply sushi rolls with the rice outside.
Again, have your nori with the rough side up.
Spread rice onto the nori, this time leaving an inch at the bottom.
Cover in toasted sesame seeds (because it looks pretty).
In one quick movement, pick up the right hand edge (if you're right handed) of the nori and flip it over so the rice underneath.
Again, assemble your ingredients an inch and a half from the bottom.
This time, when you start to roll, you'll need to wet the nori straight away to stick it down, then roll up as before.
Slice into two, and then into threes and arrange on a plate with the other maki.


You are now done! Serve with any leftover teriyaki fish (you might even want to make some extra for this - it's delicious), edamame (if you like them), we made some roasted sweet potato wedges (link) as well, spring rolls if you have them, you get the idea, anything. Oh, and lots of warmed Saki. If you don't like Saki at first, have a mouthful just as you're eating a piece of sushi, the saltiness of the sushi takes away the bitter of the Saki and the result is wonderfully sweet and salty (and more importantly alcoholic!)

This is very easily adaptable and can be made into any type of maki you like (there are some recipes online, have a google). A favourite of mine before I was vegan was uramaki with salmon, avocado and crabstick, kind of an augmented California roll and unbeatable (one thing I do truly miss).

Send us your maki and uramaki and/or photos of yourselves trying to make them (the first time is always hilarious) and enjoy!


Jess <3 sushi (last time I promise)
I lied (I'm sorry Jess)


A very full Tom and Jess x